Thursday, December 29, 2011

Books to Get you Going

At a HPB recently, I stumbled across a vintage re-purposing book that I now wish I had bought.  I cannot find it again in the store, but I did find some other books at www.amazon.com.


another one I like is:


and finally..............

Re-Fashioning - Ragtag Garlands

**Update:  the first ragtag garland I made was a gift to my sister-in-law.  She made several this year for friends and family.  I take that as a huge compliment to the popularity of the idea.  I have added these cute ragtag garlands to my etsy store.

So, whether you want to tackle the project or order one, enjoy! **


So, over my Christmas trip back home, I visited the Salvation Army clothing store where dime day happened on all clothing.  Needless to say, I spent a few dollars and walked away with some amazing finds.  I spent a couple hours today cutting apart the pieces I am using for scrap fabric or for refashioning into other items.  I have a couple of aprons cut out already.

I also made several sets of circles for fabric flowers.


And finally, I cut several pieces into strips for a very cute garland idea. 


My suggestions for this are provided:

Stay tuned for more on this re-fashioning experiment!!!

Tuesday, December 13, 2011

Hot Cranberry Spice

I like finding new recipes for traditional foods. For a couple of years I have been making cranberry spritzers, so now it's time to move on to a new drink.

Ingredients:
2 quarts apple cider
6 cups cranberry juice
1/4 cup packed brown sugar
4 cinnamon sticks
1 1/2 teaspoons whole cloves
1 lemon, thinly sliced
Directions:
1.In a large pot, combine apple cider, cranberry juice, brown sugar, cinnamon sticks, cloves and lemon slices. Bring to a boil, reduce heat, and simmer for 15 to 20 minutes. With a slotted spoon, remove cinnamon, cloves, and lemon slices. Serve hot.

Thursday, December 1, 2011

Ballet Slippers x2..........this is too cute

Ballerina Slippers: Free Pattern + Tutorial

July 07, 2010 |

UPDATE: Several of you have had trouble with the pattern link - it is updated below!!

Yay... Finally! The tutorial for the ballerina slippers... plus a free pattern!

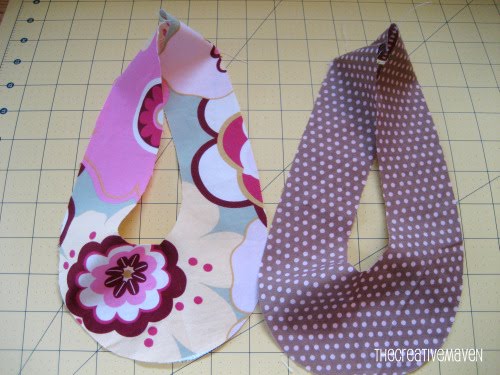
A few year's ago I saw these ballerina slippers in Mary Engelbreit's Home Companion magazine. I went out and bought all the materials, and they sat in a bag until now :). The first pair I made, I used the pattern included in the magazine, but I felt that the sizes and shape were a little off, so I made a new pattern and made a few tweaks to the design. You can download the pattern pieces below! The pattern is available in three women's sizes: small (6-7.5), medium (7.5-9), and large (9-10.5).

You will need:
  • 2 coordinating fat quarters of medium weight quilting fabric
  • 40" of medium size rick rack
  • Coordinating thread
  • 1/8th of a yard wool felt (darker colors that coordinate with your fabrics are best, since this is the part that hits the floor as you walk around = dirty!)
  • 6" length of 1/4" wide elastic
  • Coordinating embroidery thread
  • Hand needle
1. Download the patterns here and cut out your pieces. Decide which of your quilting fabrics will be the outside and which fabric is going to be the lining of the slipper. With the fabric that will be your outside, fold it right sides together and place the pattern piece for the "uppers" on the fold as marked on the pattern. Cut 2. Repeat with your other quilting weight fabric. From your lining fabric, also cut 2 from the sole pattern, using the bold line of the pattern piece.


2. Sew the heel seams of your uppers. Fold both of your "outer uppers" and both of your "lining uppers" in half and sew the heel seam with a scant 1/4" seam.


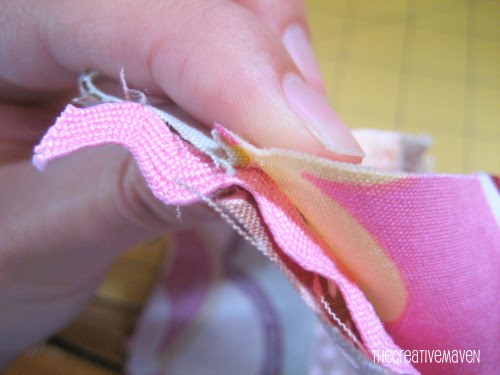
3. Assemble slipper's upper. Place one of your out uppers and one of your linings on top of each other, right sides together. You'll also need to insert your rick rack between the two layers, running it around the entire opening, and overlapping tails of rick rack over the heel seams. Pin. When it's all pinned, you want the edges of the rick rack to be flush with the fabric edges. Sew through all three layers, trying to sew down the center of the rick rack (about a 1/4" seam).


4. Turn right side out and press. Repeat with the remaining upper and lining.


5. Insert elastic along heel. Cut your 6" length of elastic into two 3" lengths. On the inside of your slipper, measure 3" in each direction from the heel seam and mark. Pin the elastic on one of the 3" marks, sew a stitch or two to anchor it. Stretch the elastic as you sew it, stretching it all the way to the other mark. IMPORTANT: sew the elastic to the wrong side of the "upper" fabric, so that it will curl the right way.


6. Sew raw edges of slipper. Pin the raw edges of the slipper together, and sew, using a scant 1/4" seam.


7. Sew a gathering stitch along the toe. Using a basting stitch on your machine, sew a gathering stitch, about 1/2" from point to point, as shown on the picture below (see blue arrows).


8. Connect the slipper body to the insole. Start by centering the heel seam on the heel of the insole. Working your way around, pin the slipper body to the insole. Use the gathering stitch to shape the toe. Sew with a scant 1/4" seam.


9. Sew wool felt sole on. Using the dotted line on the sole pattern piece, cut 2 soles from the wool felt. Press the seams of the slipper body toward the center of the bottom. Pin the wool felt sole on, and using embroidery thread and a blanket stitch, sew the sole onto the slipper.


10. Put your feet up and relax!


UPDATE 9/9/10: Use and Care Instructions: Wash on cold with like colors and let air dry.

The cutest ballet slippers Sewing Project


TUTORIAL

Here you go! The instructions to make your very own collection of custom ballet flats. Any problems with the instructions or pattern send me a message. I'll try and fix it!


1. Cut out two soles out of a medium weight leather (or pleather, which ever you choose) And two tops of the shoes out of a heavy cotton canvas (CUT ON THE FOLD), or whatever you want (If it's too lightweight, put some heavy interfacing on it. Any way you look at it, make sure it's sturdy.) **You may need to adjust the pattern for your feet. I'm about a 7, but one foots bigger then the other, so I had to figure that out. Just play around with scraps for the first pair, then make the real shoes once you’ve figured out the right size, and shape for your foot.**
2. Match up, right sides together (meaning, which ever side of the leather is going to have contact with the floor, and which ever side of the fabric you want on the outside, match those together) And pin in the direct middle of the toes.
3. Sew down one side of the shoe, making sure to curve in the heel of the fabric slightly. Then flip over and repeat on the other side. At this point, your shoe should be inside out, with the back heal open. Sew up the fabric at the heel, so you have an inside out shoe. Flip right side out.
4. Repeat with other shoe.
5. Finish off raw edge (on the top/inside of shoe) with binding or piping, or anything you want (piping is the easiest, I believe) The inside seems of the shoe don’t necessarily have to be finished, but if you want to, go ahead!
6. Any questions, send me a message, I’ll try and help as much as I can.
7. If the instructions aren’t clear I’ll post them again with pics. Just let me know!
<33 Hope it all makes sense!

Heres the pattern:
I had to make it realllyyy small, so before you print it out, put it in your Paint Shop Pro, or what not and resize it to 8 1/2 by 11" And then print it. (If its still too small, work off of the pattern i gave you and make a bigger one for your feet.) And sorry about how sloppy it is. hehe, im not too good with the scanner