Saturday, November 26, 2011
Shabby Apple Website
Wowie..........such a cute, cute clothing line. I love the feminine and flirty looks. Check out all the sweet finds a Shabby Apple.

Christmas Noise pillow case

These are just 2 of my Christmas pillow cases I created. I found white and off white pillow cases at Goodwill or Salvation Army, cleaned and repaired if needed and then set out to create a festive Christmas scene using bits and pieces of fabric. The triangle trees are made out of different red swatches from projects. I used wonder-under to adhere and then did a different decorative embroidery stitch around each one. This was the first case I completed.
 The Deck the Halls case has balls. Each one is a swatch of fabric matted onto a coordinating fabric. The hangers are embroidered on, and I used a decorative font to create the title. I embellished the edge of the case with a green and white polka-dot ribbon and a thin red lace edging.
These are fun and very easy to make. I think the starbursts add a bit more pizzaz and help accent the festivity of the season. Each case I completed has some portion of one of my favorite holiday songs:
Merry Christmas (case 1) - We Wish you a Merry Christmas
Deck the Halls (case 2) - Deck the Halls
Comfort / Joy (not shown) - Tiding of comfort and Joy
With 2 eyes made out of coal (not shown) - Frosty the Snowman
I have a few more layouts sketched into my idea journal for other songs I like, including Santa Baby. Maybe I'll get around to getting these done.
Friday, November 18, 2011
Happy Vintage Thanksgiving

This wonderful week always brings to mind a recall to a simpler and slower time. With cool air beginning to really lay stake to the shorter days of Autumn, allowing time to drift slowly by while curled in a cozy blanket teases.
Remembering that we all has so much to be thankful for, I long to erase sadness and heartbreak, longing and melancholy. This year, our family has Derrick home.
Leviticus 7:11-15. "And this is the law of the sacrifice of peace offerings, which he shall offer unto the Lord. If he offer it for a thanksgiving, then he shall offer with the sacrifice of thanksgiving unleavened cakes mingled with oil, and unleavened wafers anointed with oil, and cakes mingled with oil, of fine flour, fried."
Monday, November 14, 2011
Fabric Flowers


Well, it took me awhile to finally learn to make these, and now I think it is the coolest thing ever. What a great way to use up bits and pieces of lots of things: lace, ribbon, fabric, beads, pins.
Friday, November 11, 2011
Redesign of men's dress shirt
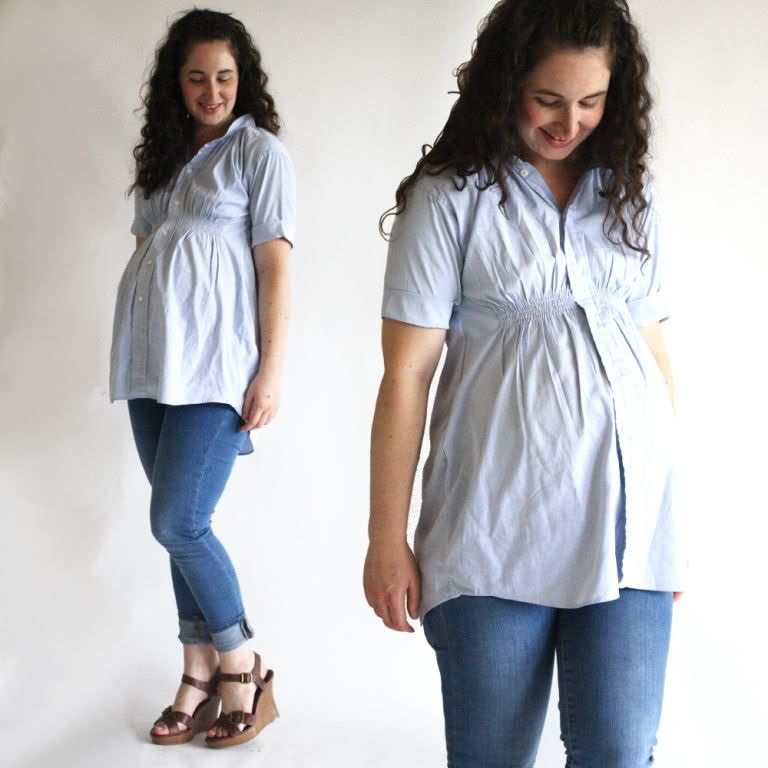
How completely vintage .......... take a men's dress shirt and re-purpose it into a cute tunic for a woman. I love this project and cannot wait to make it.
I found the idea at:
http://www.prudentbaby.com/2011/10/shirred-maternity-tunic-top.html
and all the directions for completing this project are there.
Tshirt Redo

I found this idea at:
http://brassyapple.blogspot.com/2010/04/ruffle-me-uptshirt-refashion-spring-top.html
The directions follow, and you can check out the original post for more re-purposing ideas.
Ruffle me up!
Ruffles are everywhere from tops to shoes, handbags and accessories! And they are super easy to add to any top especially when made from tshirt knit because you don't have to worry about the edges!
Download and print the entire tutorial HERE
Materials:
2 tshirts - about 2 or 3 times bigger than you normally wear
color coordinating thread
scissors
elastic thread
sewing machine
straight pins
measuring tape
Step 1: Shir the bottom of the tee sewing about 6 lines 1/4" apart. We used our sewing foot as a guide between the stitching lines.
Step 2: Cut off the collar. OPTIONAL: Cut a small V dip in the neckline if desired for a different neck shape. Set aside.
Step 3: Lay the 2nd tshirt flat. Cut off the bottom hemline. Then cut 2 strips that are 3.5" wide.
Step 4: Create 1 long strip by cutting "open" at one of the seams or simply cut the loop in half.
Step 5: Cut 1 strip 2.5" wide. Cut open as instructed above.
Step 6: Gather/Ruffle all 3 strips using a basting stitch in y our machine and gently pulling the bottom thread to gather the fabric together. (Stitch 1/4 - 1/2" in from one edge of the fabric strip)
Step 7: Pin one end of the 3.5" ruffled striped at the shoulder seam and the other end about 5-6" from the top of the shirring lines at the bottom of the tshirt lining it up in the middle.
Step 8: Adjust the gathers so the strip fits between the two pinned areas. Pin in place leaving an opening near the middle of the neckline in the front. Repeat with the other 3.5" wide ruffled strip on the opposite side of the tshirt.
Step 9: Sew the ruffles to the tshirt by stitching over the basting line.
Step 10: Fill in the open area in the top middle of the tshirt using the 2.5" wide ruffled strip. Place one end of this strip about 1 inch over the empty area. Pin along the neckline and cut the ruffled strip to be about 1 inch over the other side. Pin in place.
Step 11: Place a second layer of ruffles under this layer making it smaller in width and centering it under the first. (see 2 photos below) Stitch both layers of ruffles onto the tshirt.
OPTIONAL: to create a ruffle at the neckline and shoulder area that isn't as "full", cut and or taper the ruffled fabric towards the shoulder seam until you have reached the desired look.
Step 12: Cut off the hem on each sleeve curving the edge as pictured below.
Step 13: Shir 3 lines from the cut edge to the shoulder seam. Sew 2 shirring lines on the underpart of the sleeve too.
Add rosettes, beads, etc if desired!
I love how this top can be casual but dressy if needed too! Be comfortable this Spring and Summer by wearing a "tshirt" but look a bit more pulled together and stylish!
linking up with.....Keeping it simple, Making the World Cuter, Skip to My Lou, The Girl Creative, 11th Heaven's Homemaking Haven, A soft place to land, New Nostalgia, Tip Junkie, Silly Little Sparrow, Todays Creative Blog, Craft Edition
Subscribe to:
Comments (Atom)